Course Summary
Lesson 1 Introduction
- CHPS configuration utilizes XML as a framework for data.
- Remember, XML does not perform an action; it provides structure and transportation for information.
- The CHPS Configuration Focal Point identifies opportunities to optimize CHPS by:
- decreasing use of storage space
- establishing new data sources
- setting up a model from a university or another agency.
Lesson 2 Data Handling
- When adding new data sources to CHPS, consider these items:
- What is the data format?
- Is the data type already being imported?
- How precise should the data be (i.e., how many significant digits should be used)?
- How long do you want the data in the system? Determine the expiry time.
- To add a segment, follow these steps:
- Add a new site to the Locations.xml and LocationSets.xml files
- Create a subdirectory for the new segment
- Create a ModuleConfigFiles subdirectory and contents for the new segment
- Create the cold states files
- Create the workflow files
- Register the ModuleConfig and Workflow files
- Create a segment tree and entries in the IFD Forecast tab
- Update the ModuleInstanceSets
- Set up the forecast plot display
- Test the segment in a Stand Alone instance
- Add a rating curve and data
- Complete the spin-up runs
- Validate new configuration
- Upload the new configuration
- To optimize runtime for ensemble forecasts, you can remove unwanted time series from the ensemble runs to speed up processing time or by splitting up the workflows over several FSSs.
- Setting a time series as “temporary” decreases synch time, causes less database fragmentation, and saves space in the datastore.
Lesson 3 Products
- In order to configure the Pi-Service, define the type of data you are sending to the office, the data locations (i.e.: site ID’s, handbook 5 ID’s), and the directory to which the data is being pushed.
- The steps to configure the Event Action feature are as follows:
- Choose an event code to use as a trigger.
- Create an action configuration file.
- Upload the XML file from Step 2 to the Admin Interface, choosing a suitable action ID.
- Create an Event-Action Mapping to link the event code and the action ID.
- Schedule the appropriate task with the same tag as configured in the XML file.
- There are two options for inundation mapping: 1) Flood Mapping Module, which produces 2D maps outlining inundated areas, and 2) Using ArcGIS.
- PC Raster, a type of environmental modeling software, utilizes the Transformation and General Adapter modules to create simulation models such as runoff models.
- The Report Module puts data into a desired format, generates the reports from FEWS, and displays the reports in HTML format. The report templates organize the information into text, charts, and tables.
Lesson 4 Working with Models

- CHPS incorporates many models of various types, including models for:
- Snow Melt
- Rainfall-Runoff
- Unit-Hydrograph
- Urban Rainfall-Runoff
- Hydrodynamics
- Distributed Rainfall-Runoff
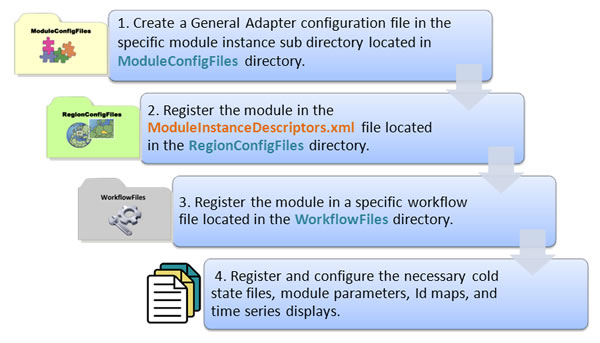
- The General Adapter module provides the ability to run external models, and it consists of three major elements in the XML file: general settings element, burn-in profile element, and the activities element.
Congratulations. You reached the end of the course material!
The course material is complete. Please log into the NWS Learning Center to complete the course assessment. You will not receive credit for the course until the NWS Learning Center assessment is completed!

