

1.4.1 Login Options
When the CHPS Interactive Forecast Display (IFD) opens, a dialog box, similar to the one on the right, opens.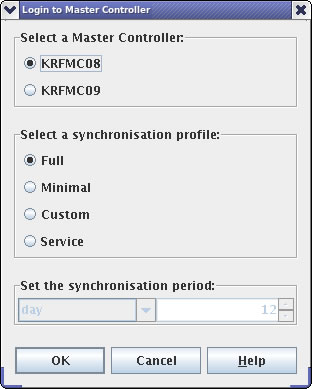
The first step is selecting a Master Controller from the Select a Master Controller portion of the GUI.
In most cases, click the primary MC, denoted as KRFMC08 on this image. If the office is using the backup servers for operations, you would log into the secondary MC.
Next, choose a synchronization profile from one of the options in the Select a synchronization section. Your choices are Full, Minimal, or Custom.
The Full option obtains all of the data needed for a forecast and is the system default.
The Minimal option keeps only one day of logs in this profile (vs. two days for the others).
The Custom option provides more days’ worth of data (10 to 20 days is typical) and/or warm states. Offices use this when rebuilding the local datastore. This adds to the initial synching time.
Note: the “synchronization period” section of the GUI is greyed out on the image at right.
If you selected the Custom profile, this option would be available.
When all of the settings are correct, click OK to log into a Master Controller so you can access system data.
Expect the process to take nearly 30 minutes before CHPS is ready to use, especially if you have been out of the office for several days.